mruby/c のクラスの作成方法
はじめに
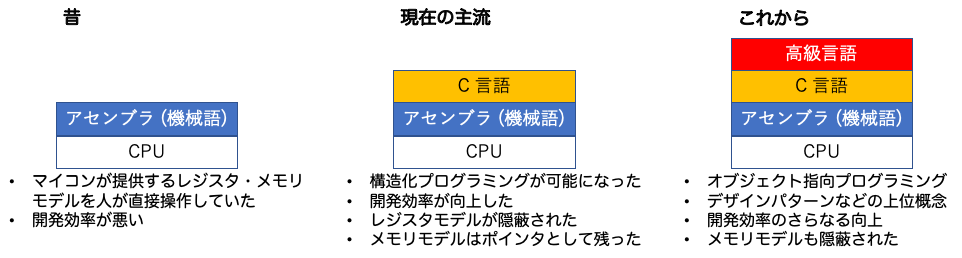
高級言語であるところの mruby/c は,下図(右)のように,C 言語の上に作られている. 言い換えると,mruby/c で書かれたプログラムは C で書かれたプログラムのラッパーとなっている. その特徴ゆえに,mruby/c でクラスを定義するためには, C 言語側も若干の編集が必要になることに注意されたい.
クラス作成の概要
mruby/c のクラス定義を別ファイルで行う場合には,以下の手順を踏むことになる.
- main/Kconfig.projbuild を編集し,make menuconfig に項目を追加する.
- main/main.c において,後述の作法に従って mruby/c プログラムを include する.
- mrblib/models/ 以下に mruby/c で書かれたプログラムを置く.ここで新たなクラスを定義する.
- mrblib/loops/ 以下に追加したクラスを用いたメインプログラム (master.rb) を書く.
本演習で用いている iotex-mrubyc-esp32 は以下のようなディレクトリ構造をしており,上記の手順に従って 4 箇所を修正することになる.
$ tree -L 4 iotex-mrubyc-esp32/

  mrubyc-template-esp32/
  ├── Makefile
  ├── components
  │   └── mrubyc              mruby/c の VM のソースなど
..........(中略)...............
  ├── main
  │   ├ Kconfig.projbuild   make menuconfig に出すメニューの定義  ← このファイルを編集
  │   └ mrbc_esp32_gpio.c     ラッパー
  │   └ mrbc_esp32_gpih
..........(中略)...............
  │   └── main.c        メインプログラム (C 言語)  ← このファイルを編集
  └── mrblib
      ├── loops        メインプログラム置き場
      └── models             クラス置き場      ← ここにプログラムを置く.
練習問題
mruby/c のI2C の課題 で作成した LCD と RTC を用いたプログラムから,LCD クラスを作成する. なお,リアルタイム用のクラスは課題 (後述) とする.
$ git clone https://github.com/gfd-dennou-club/iotex-esp32-mrubyc.git mrubyc-11-class

$ cd mrubyc-11-class
手順 0: メインファイル内でクラス定義する
いきなりクラスの定義を別ファイルで行うのは大変なので,まずはメインファイル内で LCD クラスを定義してみる. mruby/c のI2C の課題 で作成した LCD と RTC を用いたプログラムから LCD 部分を抜き出し, LCD クラスを作ってみると,以下のようになる.主な修正点は以下である.
- コンストラクタの定義と利用 (7-9 行目, 65 行目)
- 各メソッドの引数の変更.引数から i2c を削る (コンストラクタを定義したので不要に)
メソッド名から lcd_ を削除.利用の際は, lcd_init でなく,lcd.init となる.
$ vi mrblib/loops/master.rb

  1  # coding: utf-8
  2
  3  class LCD
  4
  5    ADDRESS = 0x3e
  6
  7    def initialize(i2c)
  8      @i2c = i2c
  9    end
  10
  11   def cmd(cmd)
  12     @i2c.write(LCD::ADDRESS, [0x00, cmd])
  13   end
  14
  15   def data(data)
  16     @i2c.write(LCD::ADDRESS, [0x40, data])
  17   end
  18
  19   def clear()
  20     cmd( 0x01)
  21     sleep 0.1
  22   end
  23
  24   def home0()
  25     cmd( 0x02)
  26     sleep 0.1
  27   end
  28
  29   def home1()
  30     cmd( 0x40|0x80)
  31     sleep 0.1
  32   end
  33
  34   def cursor(x, y)
  35     pos = (x + y * 0x40) | 0x80
  36     cmd( pos)
  37     sleep 0.1
  38   end
  39
  40   def init()
  41     sleep 0.2
  42     [0x38, 0x39, 0x14, 0x70, 0x56, 0x6c].each do |cmd|
  43       cmd( cmd)
  44     end
  45     sleep(0.3)
  46     [0x38, 0x0c, 0x01].each do |cmd|
  47       cmd( cmd)
  48     end
  49     sleep(0.1)
  50   end
  51
  52   def print(data)
  53     data.length.times do |n|
  54       data( data[n].ord)
  55     end
  56   end
  57
  58 end
  59
  60
  61 #I2C 初期化
  62 i2c = I2C.new(22, 21)
  63
  64 # LCD 初期化
  65 lcd = LCD.new(i2c)
  66 lcd.init
  67
  68 # LCD に "Hello World" 表示
  69 lcd.cursor(1, 0)
  70 lcd.print( "Hello!x")
実行して,LCD に文字が表示されるか確認する.
$ make menuconfig

  [*] USR ESP32 I2C

$ make

$ make flash monitor
手順 1: main/Kconfig.projbuild の修正
図に示すように,main/Kconfig.projbuild に項目を増やすと,make menuconfig した時のメニューが増える. 新たにクラスを定義するときは,main/Kconfig.projbuild を編集し,そのクラスを使うか否かのメニューを出すようにしておくと良い.
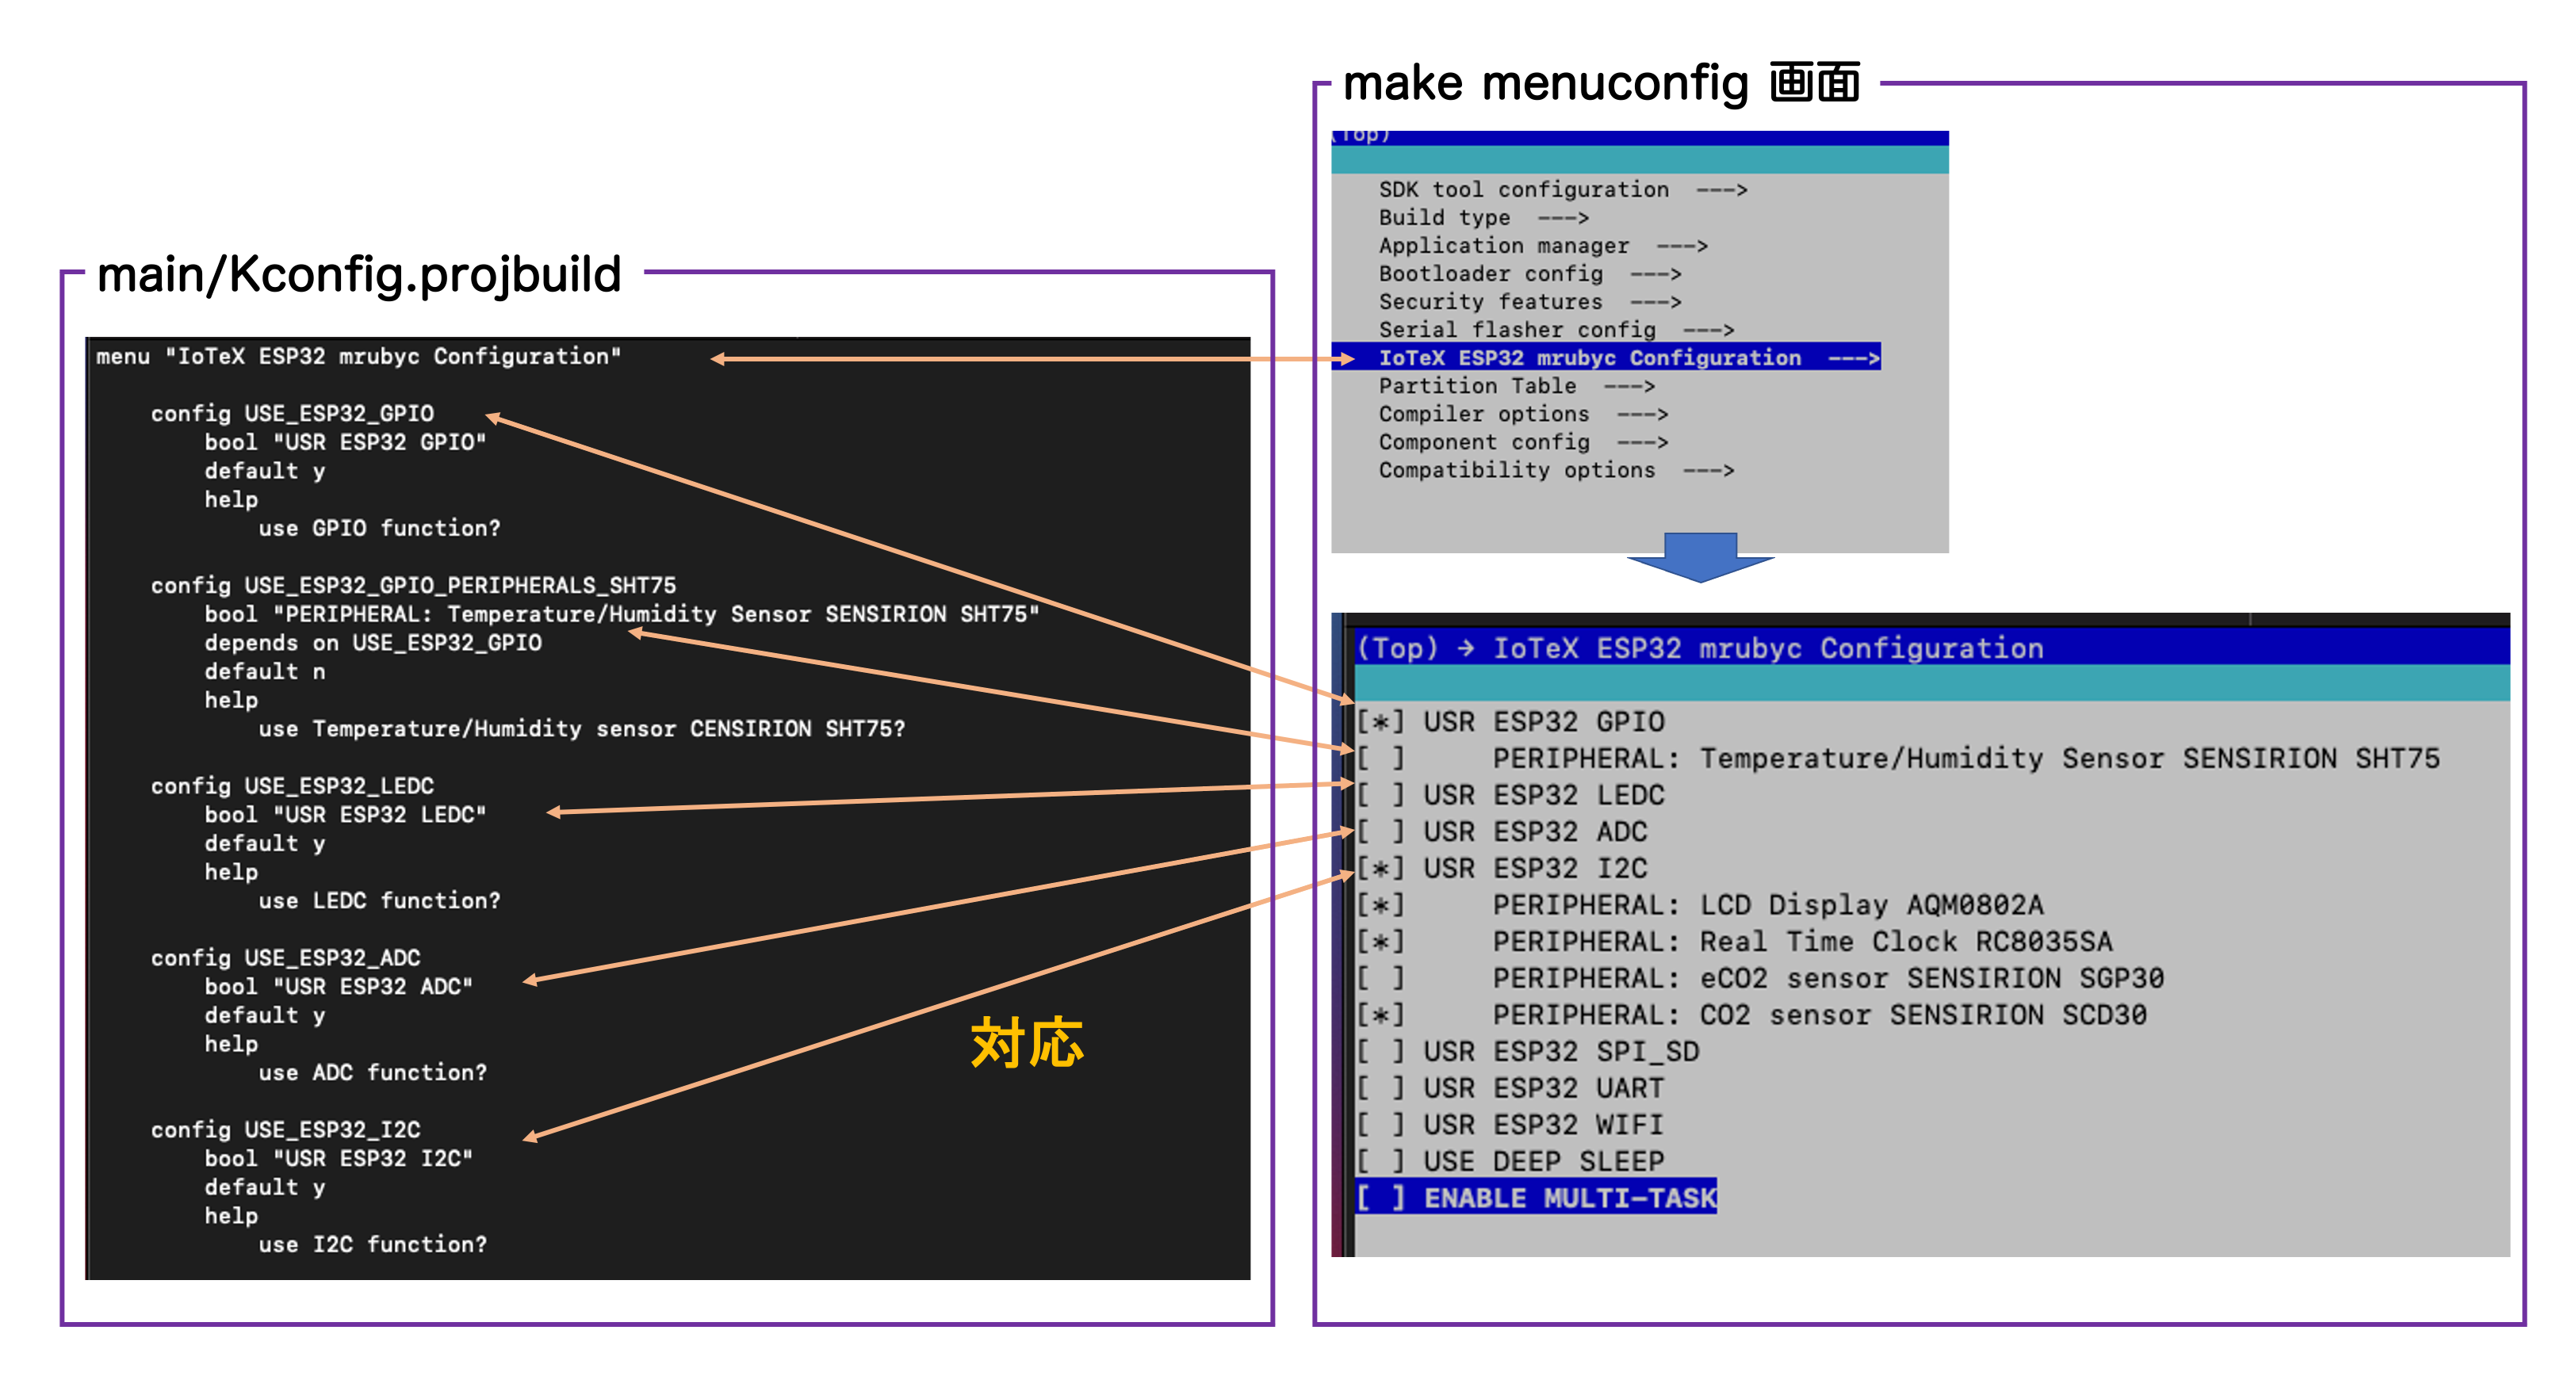
今回は LCD 用に USE_ESP32_I2C_LCD というエントリを新たに追加することにする. これは I2C 接続なので,depends on で USE_ESP32_I2C に依存させる.
$ vi main/Kconfig.projbuild

   ...(中略)...

   config USE_ESP32_I2C
     bool "USR ESP32 I2C"
     default y
     help
         use I2C function?

   config USE_ESP32_I2C_LCD
     bool "PERIPHERAL: LCD Display"
     depends on USE_ESP32_I2C
     default n
     help
         use My LCD Display?

   ...(後略)...
手順 2: main/main.c の修正
make menuconfig でチェックを入れたクラスを利用可能とするため,C 言語側の メインプログラム (main/main.c) を修正する.なお, main/Kconfig.projbuild において "config USE_ESP32_I2C_LCD" と記述したので,make menuconfig でその項目をチェックしたか否かの情報は, 変数 CONFIG_USE_ESP32_I2C_LCD に保存される (接頭子として CONFIG_ が付される). ifdef を用いて,チェックが入った場合にのみ読み込むよう設定する.
$ vi main/main.c

  ...........(前略)...........
  //*********************************************
  // ENABLE CLASSES and MASTER files written by mruby/c
  //
  // #include "models/[replace with your file].h"
  // #include "loops/[replace with your file].h"
  //*********************************************
  ...
  #ifdef CONFIG_USE_ESP32_I2C_LCD
  #include "models/lcd.h"   // システムが自動生成する mruby/c の LCD クラス (mrblib/models/lcd.rb) のヘッダファイルを読み込むための設定. 拡張子は .h に変えておくこと
  #endif
  ...........(中略)...........

  /*
    !!!! Add names of your ruby files                              !!!!
    !!!! example: mrbc_create_task( [replace with your task], 0 ); !!!!
   */
  ...
  #ifdef CONFIG_USE_ESP32_I2C_LCD
    printf("start My LCD (mruby/c class)\n");
    mrbc_create_task( lcd, 0 );   // mruby/c で書かれた LCD クラス (mrblib/models/lcd.rb) を呼び出す設定
  #endif
  ...........(後略)...........
手順 3: クラスの定義ファイル (mruby/c) の作成
「手順 0」で作ったメインプログラムからクラス部分を別ファイル (mrblib/models/lcd.rb) に保存する.
$ vi mrblib/models/lcd.rb

  1  # coding: utf-8
  2  class LCD
  3
  4    ADDRESS = 0x3e
  5
  6    def initialize(i2c)
  7      @i2c = i2c
  8    end
  9
  10   def cmd(cmd)
  11     @i2c.write(LCD::ADDRESS, [0x00, cmd])
  12   end
  13
  14   def data(data)
  15     @i2c.write(LCD::ADDRESS, [0x40, data])
  16   end
  17
  18   def clear()
  19     cmd(0x01)
  20     sleep 0.1
  21   end
  22
  23   def home0()
  24     cmd(0x02)
  25     sleep 0.1
  26   end
  27
  28   def home1()
  29     cmd(0x40|0x80)
  30     sleep 0.1
  31   end
  32
  33   def cursor(x, y)
  34     pos = (x + y * 0x40) | 0x80
  35     cmd(pos)
  36     sleep 0.1
  37   end
  38
  39   def init()
  40     sleep 0.2
  41     [0x38, 0x39, 0x14, 0x70, 0x56, 0x6c].each do |cmd|
  42       cmd(cmd)
  43     end
  44     sleep(0.3)
  45     [0x38, 0x0c, 0x01].each do |cmd|
  46       cmd(cmd)
  47     end
  48     sleep(0.1)
  49   end
  50
  51   def print(data)
  52     data.length.times do |n|
  53       data(data[n].ord)
  54     end
  55   end
  56
  57 end
手順 4: メインプログラム (mruby/c) の作成
「手順 0」で作ったメインプログラムからクラス部分を削除する.
$ vi mrblib/loops/master.rb

  1  # coding: utf-8
  2
  3  #I2C 初期化
  4  i2c = I2C.new(22, 21)
  5
  6  # LCD 初期化
  7  lcd = LCD.new(i2c)
  8  lcd.init
  9
  10 # LCD に "Hello World" 表示
  11 lcd.cursor(1, 0)
  12 lcd.print( "Hello!")
  13
  14 lcd.home1()
  15 lcd.print( "from ESP")
実行
make menuconfig で作成した LCD クラスを include し, マイコンにプログラムを書き込む. LCD に文字が表示されることを確認すること.
$ make menuconfig

  [*] USR ESP32 I2C
  [*]     My LCD

$ make

$ make flash monitor
課題
mruby/c のI2C の課題 で作成した LCD と RTC を用いたプログラム を元にして, RTC2 クラス (mrblib/models/rtc2.rb) を定義し,動作させよ.